Mixing Levels Chart
Overview
What is a mixing levels chart?
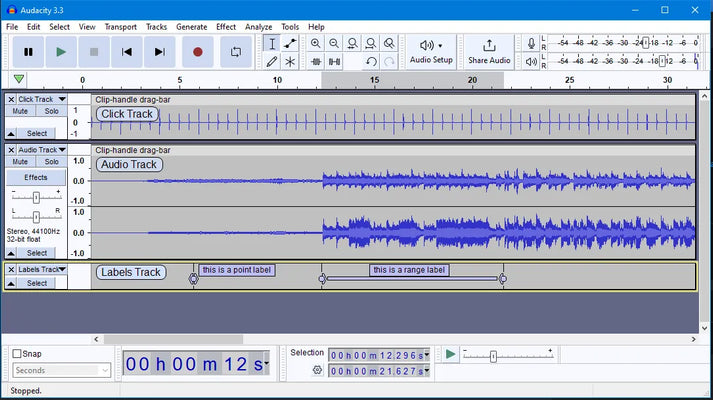
A mixing levels chart visually represents the different audio levels in a mix. It provides a clear and organized way to understand the relative loudness of each audio source. The chart typically includes a table that lists the audio sources and their corresponding levels. This allows audio engineers to make informed decisions when adjusting the levels during the mixing process. Using a mixing levels chart, they can ensure that each audio source is appropriately balanced and that the overall mix sounds cohesive and professional.
Importance of a mixing levels chart
A mixing levels chart is an essential tool for audio engineers and producers. It visually represents the volume levels of different audio sources in a mix. By clearly understanding the relative levels of each audio source, engineers can ensure that the mix is well-balanced and that every element is overpowering and getting lost in the mix. This is crucial for creating a professional and polished sound. A mixing levels chart also helps identify potential issues such as clipping or distortion, allowing engineers to make necessary adjustments. Overall, a mixing levels chart is a valuable resource that enhances the quality and clarity of a mix.
Components of a mixing levels chart
A mixing levels chart comprises several components that help organize and visualize the audio levels. These components include:
- Audio sources: This column lists all the audio sources that will be mixed together.
- Level assignments: This column specifies the desired level for each audio source, which helps achieve the desired balance.
- Metering: This section provides visual feedback on the current audio levels, allowing the mixer to monitor and adjust as needed.
By having these components in a mixing levels chart, audio engineers can effectively manage and control the levels of various audio sources, ensuring a well-balanced and professional mix.
Creating a Mixing Levels Chart
Identify the audio sources.
After understanding the concept of a mixing levels chart, the next step is to identify the audio sources that will be part of the chart. This involves listing all the different audio elements that will be mixed together, such as vocals, instruments, and effects. It is essential to clearly understand all the audio sources to ensure accurate level assignments in the chart. Additionally, it is crucial to consider each audio source's dynamic range and frequency response to achieve a balanced and cohesive mix. Once the audio sources are identified, they can be assigned appropriate levels in the mixing levels chart.
Determine the desired levels.
After identifying the audio sources, the next step in creating a mixing levels chart is determining the desired levels for each source. This involves considering each source's relative importance and prominence in the overall mix. Higher levels may be assigned to sources that need to stand out, while lower levels may be transferred to background or supporting elements. It is essential to balance the levels to ensure a cohesive and well-balanced mix. Once the desired levels have been determined, they can be assigned to each audio source in the chart.
Assign levels to each audio source.
Once you have determined the desired levels for each audio source, the next step is to assign levels to each source in the mixing levels chart. This can be done by using a combination of table and list formats. In the table, list each audio source and its corresponding desired level. Use a list format to provide additional details or instructions for each audio source, such as specific EQ settings or compression techniques. By assigning levels to each audio source in the mixing levels chart, you create a clear roadmap for the mixing process, ensuring that each audio element is balanced correctly and optimized for the final mix.
Using a Mixing Levels Chart
Adjusting levels during mixing
During the mixing process, it is crucial to adjust the levels of each audio source to achieve a balanced and cohesive sound. A mixing levels chart visually represents the desired levels for each audio source, making it easier to make precise adjustments. By referring to the chart, audio engineers can ensure smooth and accurate sound in the mix. Additionally, the chart helps maintain the dynamic range and clarity of the audio. It serves as a guide for achieving a professional and polished sound during the mixing process.
Balancing the audio sources
Once the desired levels for each audio source have been determined, the next step in using a mixing levels chart is balancing the audio sources. Balancing involves adjusting the volume levels of each source to ensure they blend well together and create a cohesive sound. This can be achieved by using the faders or knobs on the mixing console to increase or decrease the volume of each source. It is important to carefully listen to the overall mix and make subtle adjustments to achieve a balanced and harmonious sound. Additionally, panning techniques can help distribute the audio sources across the stereo field, adding depth and width to the mix. By balancing the audio sources effectively, you can create a professional and polished mix that enhances the listening experience for the audience.
Monitoring the levels
Once you have set the desired levels for each audio source, it is crucial to continuously monitor the levels throughout the mixing process. This ensures that the audio elements are adequately balanced without distortion or clipping. Monitoring the levels involves using audio meters or visual indicators to keep track of the signal strength of each audio source. Additionally, it is essential to regularly check the peak levels to prevent any potential issues. You can make real-time adjustments and maintain a high-quality audio mix by actively monitoring the levels.
Conclusion
Benefits of using a mixing levels chart
A mixing levels chart provides several benefits for audio engineers and producers. Firstly, it allows for precise control over the levels of different audio sources, ensuring a balanced and cohesive mix. This leads to improved clarity and separation of instruments and vocals. Secondly, a mixing levels chart helps avoid clipping and distortion by setting appropriate levels for each source. It also assists in maintaining consistent levels throughout the mixing process, resulting in a more professional and polished sound. Lastly, using a mixing levels chart enables faster and more efficient mixing, as it provides a visual reference for adjusting levels and making quick decisions. Overall, incorporating a mixing levels chart into the workflow can significantly enhance the quality and effectiveness of the mixing process.
Tips for creating an effective mixing levels chart
When creating an effective mixing levels chart, remember a few tips. Firstly, labeling each audio source clearly and accurately is essential to avoid confusion during mixing. Secondly, assigning appropriate levels to each audio source is crucial for achieving a balanced and professional sound. Additionally, it is recommended to use a color-coded system or a visual representation, such as a table or a graph, to make the chart more organized and user-friendly. Lastly, regularly review and update the mixing levels chart to adapt to changes in the audio setup or project requirements.
Final thoughts
In conclusion, a mixing levels chart is valuable for audio engineers and producers to ensure the proper balance and levels of audio sources in a mix. It helps achieve a precise and professional sound by visually representing the desired levels for each audio source. Following the steps outlined in this article, you can create an effective mixing levels chart to enhance significantly your mixing process. Remember to regularly monitor and adjust the levels during mixing to maintain a balanced and cohesive sound. Incorporating a mixing levels chart into your workflow can significantly improve the quality of your mixes and make the entire process more efficient and enjoyable.

